
Introduction
A few days ago I created a post using the Browser In The Browser phishing attack by mrd0x. Although this attack is great and a good starting point, it’s still relatively difficult to impossible to reliably bypass MFA. When preventing account breaches, the first recommendation made is usually to enable Multi-Factor Authentication. This is correct and should be enabled on all accounts/services where technically feasible however, it is not a silver bullet; certain MFA methods are more prone to being phishable and some methods of attacks can skip the need to phish MFA credentials entirely – these attacks are typically considered sophisticated but from an attackers standpoint, they’re still relatively low effort, easily achievable and very effective. I’d wager that using certain methods with the right circumstances can very likely trick any user.
Credit goes to mrd0x again as I will be using two of his methods with some small changes in-between:
https://mrd0x.com
https://twitter.com/mrd0x
What is a Browser In The Browser attack?
BITB is designed to trick the user into thinking a second browser window has opened and can be trusted when it is actually just an iFrame which is on the page. As it’s an iFrame, users can essentially make it display what they’d like including fake SSL certficates, “real domain names” and fake login pages.
The picture below can highlight how deceptive it is. If used by an attacker, they would have a domain name similar to the service they’re phishing rather than the file path. They would have typically have a background to make the site more believable.
As you can see, the fake browser window (BITB) is designed to look and operate like a separate browser window but it is actually an iFrame and the content is fake. The URL can be whatever the attacker decides as it’s just text masquerading as a browser/URL and the Office 365 page is just a phishing page created by the attacker.

Now… Browser In The Browser attacks are impressive and convincing but we can take it a step further by pairing it with another attack.
What is a noVNC attack?
What is noVNC? Well… VNC stands for Virtual Network Computing. It is a cross-platform screen sharing system that was created to remotely control another computer. VNC can run in browsers which is convenient, especially for the attacker and can even work flawlessly on mobile devices. noVNC will allow a user to remotely control another computer within the browser.
Why is this useful?
Phishing credentials via fake login pages is still effective but when the account is paired with MFA, it can reduce the chances of success and alongside this, fake login pages have a lot of telltale signs of being suspicious. But what if the victim unknowingly was entering credentials and succeeding MFA challenges on an attackers computer via a browser using noVNC… This would allow the attacker to run a keylogger or capture the session/authorisation cookies and bypass MFA entirely. Remember – if the victim logs into a legitimate website on the VNC session, the cookies can still be grabbed. As the site may be legitimate, it makes it increasingly difficult for the victim to identify any wrong doing.
TL;DR?
Let’s simplify it a little.
Attacker creates a noVNC server and hosts it externally
Attacker sets the web browser to Kiosk mode to hide the fact it’s a remote session
Attacker sends a phishing email
Victim clicks phishing email and unknowingly connects onto the noVNC session
Victim notices the site is legitimate and enters credentials and MFA prompt
Attacker keylogs or capture cookies
Proof-Of-Concept (POC)
Step 1: Deploy Ubuntu 20.04.
I have tried with newer versions of Ubuntu and had various issues. After spending hours troubleshooting, I decided it would just be easiest to just to use a known working version.
Step 2: Install TigerVNC (Run commands below)
sudo apt update
sudo apt install tigervnc-standalone-server tigervnc-xorg-extension tigervnc-viewer
sudo apt install ubuntu-gnome-desktop
sudo systemctl enable gdm
sudo systemctl start gdm
Note if you get the following error when running sudo systemctl enable gdm, follow step 2.5

Step 2.5 – Resolving possible error from sudo systemctl enable gdm (Run commands below)
cd /lib/systemd/system
Then run
sudo gedit gdm.service
You will need to scroll to the bottom and add the following:
[Install]
WantedBy=multi-user.target
Once this has been added, run the command: “sudo systemctl enable gdm” again and you should now see the following:

Don’t forget to also run sudo systemctl start gdm before progressing to step 3.
Step 3: Setup VNC password (Run command below)
vncpasswd
Step 4: Create File
gedit ~/.vnc/xstartup
Step 5: Paste the following into the newly created file and then save the file:
#!/bin/sh
# Start Gnome 3 Desktop
[ -x /etc/vnc/xstartup ] && exec /etc/vnc/xstartup
[ -r $HOME/.Xresources ] && xrdb $HOME/.Xresources
vncconfig -iconic &
dbus-launch –exit-with-session gnome-session &

Step 6: Change the permissions on the file to make it an executable
chmod +x ~/.vnc/xstartup
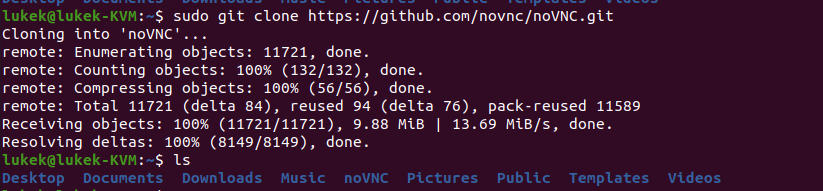
Step 7: Download git and then clone the Github repo
sudo apt install git
git clone https://github.com/novnc/noVNC.git
When you clone the repo, make sure you’re within your home/user profile
Step 8: Running noVNC
# Running it locally
# Assumes VNC is running on port 5901
# Check port by running vncserver -list
sudo ./noVNC/utils/novnc_proxy –vnc localhost:5901# To access it locally use a SSH tunnel:
ssh -L 6080:127.0.0.1:6080 root@server# Running it publicly on port 80
ufw allow http
./noVNC/utils/novnc_proxy –vnc 0.0.0.0:5901 –listen 80
As this is a POC, we will be running it locally and using the first method.

Step 9: Accessing the noVNC session
When following Step 8, it will have generated a URL as seen on the screenshot above and below:

Step 10: Start the VNC Server (Run command below)
vncserver
Now, if we browse to the link on step 8 and 9, we will see the following:

We now have VNC running in a web browser although, the credential box is not falling anyone!
Step 11:
We can easily get around the credential box by including the password within the url.
Before:
http://lukek-kvm:6080/vnc.html?host=lukek-KVM&port6080
After:
http://lukek-kvm:6080/vnc.html?autoconnect=true&password=POCpassword&resize=remote
Note – the password= should match whatever password you set during step 3.
Note 2 – &resize= will allow it to display better although you can toy with the variables to see what fits best for you.

We now have VNC in the browser!
It will ask for a password during this setup, this will be the user account of the machine. For POC purposes, I am using the same account as the host but ideally you would create a new account without sudo privileges. Once you enter the right paramters into the URL, you can browse to it and it will also login.
The parameters will be similar to the following:
http://IP.OF.YOUR.VNC:MACHINE/vnc.html?autoconnect=true&password=bob123There are many different query parametersthat can be used and each can help provide a different result and/or make the setup slightly more convincing.
Now all you have to do is browse to the phishing page and then put the VNC session into KIOSK mode. You can do this by running terminal and typing the following:
firefox --kiosk phishingpage[dot]com
This will then maximise the VNC session and hide most of the features that would indicate you’re in a VNC session. You would then need to share the link with the query parameters into the URL with the victim who will be none the wiser. Remember, you can customise the parameters in the vnc.html file. This will allow you to make the URL look more believable.
Now, using the BITB attack above paired with NoVNC with Kiosk mode, it will trick the end user into thinking they’re browsing to a legitimate site when instead, they’re connecting onto your machine via VNC and entering their credentials into a box you control.
You can keylog, capture cookies and far more. Eitherway, the options are there. You can also setup a script to auto disconnect the user after a time period or a succesful login.
Overall this whole setup is exaggerated and should be used for demonstrational purposes only. A far more accurate, less effort method would be to use EvilNginx. It does 99% of the hard work for you and can allow you to be up and running in a short amount of time. The only time consuming factor would be waiting for DNS records to propagate.